Gary Guo

Learning never ends


  • Home

  • About

  • Tags

  • Categories

  • Archives

  • Sitemap

  • Search

Enhance ABAP Code provided by Vendor in SAP

Posted on 2018-03-23 | In ABAP

Background

In SAP, sometimes we may need to add an enhancement implementation for an implicit enhancement spot of Vendor provided ABAP code. In that case, when you are trying to enhance the vendor code, you may receive an error message Object <object_type> <object_name> cannot be enhanced; software component Unknown cannot be enhanced.

Analysis

After the analysis, we find that in the function TR_GET_DLVUNIT_CHANGEABILITY, it will check table CVERS and DLV_SYSTC to see if the software component is changeable or not. If not, the error message will display. The software component is assigned to the package (development class) of the ABAP code.

To fix the issue, we tried to find a t-code or program to update table entries in CVERS and DLV_SYSTC to set the changeable flag to Yes for the software component, but with no luck.

Later, we tried to update the software component for the package, and below is the solution.

Solution

Run t-code SE03, and choose Administration -> Display/Change Namespaces. Switch to change mode, double click on the namespace /<vendor_ns>/ of the vendor package, change Namespace role to C: Recipient and save the entry.

Run t-code SE80, choose Package, input the package name, double click on the package, switch to change mode, change Software Component to HOME, and save the package.
SSL Client Authentication and SSL Server Authentication

Posted on 2018-03-22 | In Network

Messages Exchanged During SSL Handshake

The following steps describes the sequence of messages exchanged during an SSL handshake. These step describe the programmatic details of the messages exchanged during the SSL handshake.

  1. The client sends the server the client’s SSL version number, cipher settings, randomly generated data, and other information the server needs to communicate with the client using SSL. Client hello

  2. The server sends the client the server’s SSL version number, cipher settings, randomly generated data, and other information the client needs to communicate with the server over SSL. The server also sends its own certificate and, if the client is requesting a server resource that requires client authentication, requests the client’s certificate. Server hello Certificate Certificate request

  3. The client can use some of the information sent by the server to authenticate the server. For details, see Server Authentication During SSL Handshake. If the server cannot be authenticated, the user is warned of the problem and informed that an encrypted and authenticated connection cannot be established. If the server can be successfully authenticated, the client goes on to Step 4.

  4. Using all data generated in the handshake so far, the client, with the cooperation of the server, depending on the cipher being used, creates the pre-master secret for the session, encrypts it with the server’s public key, obtained from the server’s certificate, sent in Step 2, and sends the encrypted pre-master secret to the server. Client key exchange

  5. If the server has requested client authentication (an optional step in the handshake), the client also signs another piece of data that is unique to this handshake and known by both the client and server. In this case the client sends both the signed data and the client’s own certificate to the server along with the encrypted pre-master secret. Certificate Client key exchange

  6. If the server has requested client authentication, the server attempts to authenticate the client. For details, see Client Authentication During SSL Handshake. If the client cannot be authenticated, the session is terminated. If the client can be successfully authenticated, the server uses its private key to decrypt the pre-master secret, then performs a series of steps (which the client also performs, starting from the same pre-master secret) to generate the master secret.

  7. Both the client and the server use the master secret to generate the session keys, which are symmetric keys used to encrypt and decrypt information exchanged during the SSL session and to verify its integrity—that is, to detect changes in the data between the time it was sent and the time it is received over the SSL connection.

  8. The client sends a message to the server informing it that future messages from the client are encrypted with the session key. It then sends a separate (encrypted) message indicating that the client portion of the handshake is finished. Change cipher spec Client finished

  9. The server sends a message to the client informing it that future messages from the server are encrypted with the session key. It then sends a separate (encrypted) message indicating that the server portion of the handshake is finished. Change cipher spec Server finished

  10. The SSL handshake is now complete, and the SSL session has begun. The client and the server use the session keys to encrypt and decrypt the data they send to each other and to validate its integrity.

Before continuing with a session, directory servers can be configured to check that the client’s certificate is present in the user’s entry in an LDAP directory. This configuration option provides one way of ensuring that the client’s certificate has not been revoked.

Both client and server authentication involve encrypting some piece of data with one key of a public-private key pair and decrypting it with the other key:

  • In the case of server authentication, the client encrypts the pre-master secret with the server’s public key. Only the corresponding private key can correctly decrypt the secret, so the client has some assurance that the identity associated with the public key is in fact the server with which the client is connected. Otherwise, the server cannot decrypt the pre-master secret and cannot generate the symmetric keys required for the session, and the session is terminated.

  • In the case of client authentication, the client encrypts some random data with the client’s private key—that is, it creates a digital signature. The public key in the client’s certificate can correctly validate the digital signature only if the corresponding private key was used. Otherwise, the server cannot validate the digital signature and the session is terminated.

Server Authentication During SSL Handshake

SSL-enabled client software always requires server authentication, or cryptographic validation by a client of the server’s identity. The server sends the client a certificate to authenticate itself. The client uses the certificate to authenticate the identity the certificate claims to represent.

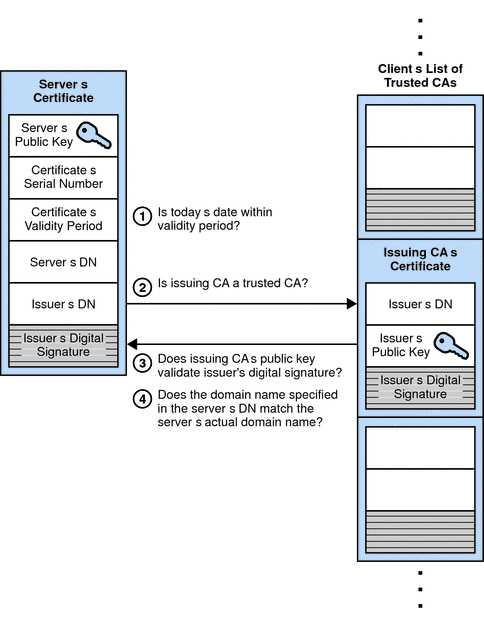
To authenticate the binding between a public key and the server identified by the certificate that contains the public key, an SSL-enabled client must receive a yes answer to the four questions shown in the following figure.

Figure 5–9 Authenticating a Server Certificate During SSL Handshake
Server authentication

An SSL-enabled client goes through the following steps to authenticate a server’s identity:

  1. Is today’s date within the validity period?

    The client checks the server certificate’s validity period. If the current date and time are outside of that range, the authentication process won’t go any further. If the current date and time are within the certificate’s validity period, the client goes on to the next step.

  2. Is the issuing CA a trusted CA?

    Each SSL-enabled client maintains a list of trusted CA certificates, represented by the shaded area on the right—hand side of Figure 5–9. This list determines which server certificates the client accepts. If the distinguished name (DN) of the issuing CA matches the DN of a CA on the client’s list of trusted CAs, the answer to this question is yes, and the client goes on to the next step. If the issuing CA is not on the list, the server is not authenticated unless the client can verify a certificate chain ending in a CA that is on the list.

  3. Does the issuing CA’s public key validate the issuer’s digital signature?

    The client uses the public key from the CA’s certificate (which it found in its list of trusted CAs in step 2) to validate the CA’s digital signature on the server certificate being presented. If the information in the server certificate has changed since it was signed by the CA or if the CA certificate’s public key doesn’t correspond to the private key used by the CA to sign the server certificate, the client won’t authenticate the server’s identity. If the CA’s digital signature can be validated, the server treats the user’s certificate as a valid “letter of introduction” from that CA and proceeds. At this point, the client has determined that the server certificate is valid.

  4. Does the domain name in the server’s certificate match the domain name of the server itself?

    This step confirms that the server is actually located at the same network address specified by the domain name in the server certificate. Although step 4 is not technically part of the SSL protocol, it provides the only protection against a form of security attack known as man-in-the-middle. Clients must perform this step and must refuse to authenticate the server or establish a connection if the domain names don’t match. If the server’s actual domain name matches the domain name in the server certificate, the client goes on to the next step.

  5. The server is authenticated.

    The client proceeds with the SSL handshake. If the client doesn’t get to step 5 for any reason, the server identified by the certificate cannot be authenticated, and the user is warned of the problem and informed that an encrypted and authenticated connection cannot be established. If the server requires client authentication, the server performs the steps described in Client Authentication During SSL Handshake.

After the steps described here, the server must successfully use its private key to decrypt the pre-master secret sent by the client.

Client Authentication During SSL Handshake

SSL-enabled servers can be configured to require client authentication, or cryptographic validation by the server of the client’s identity. When a server configured this way requests client authentication separate piece of digitally signed data to authenticate itself. The server uses the digitally signed data to validate the public key in the certificate and to authenticate the identity the certificate claims to represent.

The SSL protocol requires the client to create a digital signature by creating a one-way hash from data generated randomly during the handshake and known only to the client and server. The hash of the data is then encrypted with the private key that corresponds to the public key in the certificate being presented to the server.

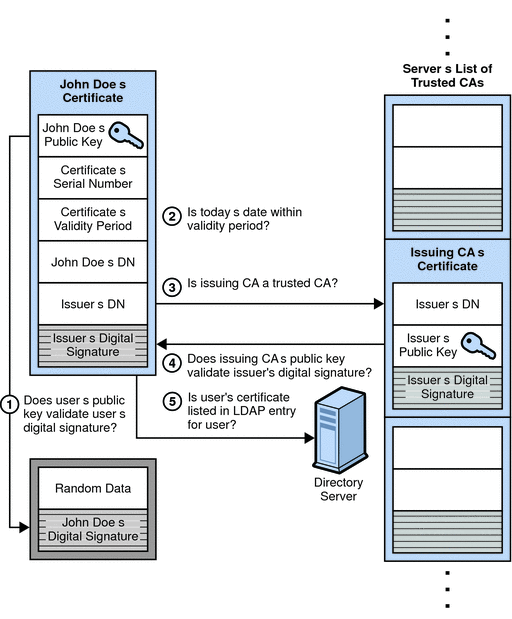
To authenticate the binding between the public key and the person or other entity identified by the certificate that contains the public key, an SSL-enabled server must receive a yes answer to the first four questions shown in Figure 5–10. Although the fifth question is not part of the SSL protocol, directory servers can be configured to support this requirement to take advantage of the user entry in an LDAP directory as part of the authentication process.

Figure 5–10 Authentication and Verification During SSL Handshake
Client authentication

An SSL-enabled server goes through the following steps to authenticate a user’s identity:

  1. Does the user’s public key validate the user’s digital signature?

    The server checks that the user’s digital signature can be validated with the public key in the certificate. If so, the server has established that the public key asserted to belong to John Doe matches the private key used to create the signature and that the data has not been tampered with since it was signed.

    At this point, however, the binding between the public key and the DN specified in the certificate has not yet been established. The certificate might have been created by someone attempting to impersonate the user. To validate the binding between the public key and the DN, the server must also complete steps 3 and 4 in this list.

  2. Is today’s date within the validity period?

    The server checks the certificate’s validity period. If the current date and time are outside of that range, the authentication process won’t go any further. If the current date and time are within the certificate’s validity period, the server goes onto the next step.

  3. Is the issuing CA a trusted CA?

    Each SSL-enabled server maintains a list of trusted CA certificates, represented by the shaded area on the right—hand side of Figure 5–10. This list determines which certificates the server accepts. If the DN of the issuing CA matches the DN of a CA on the server’s list of trusted CAs, the answer to this question is yes, and the server goes on to the next step. If the issuing CA is not on the list, the client is not authenticated unless the server can verify a certificate chain ending in a CA that is trusted or not trusted within their organizations by controlling the lists of CA certificates maintained by clients and servers.

  4. Does the issuing CA’s public key validate the issuer’s digital signature?

    The server uses the public key from the CA’s certificate (which it found in its list of trusted CAs in the previous step) to validate the CA’s digital signature on the certificate being presented. If the information in the certificate has changed since it was signed by the CA or if the public key in the CA certificate doesn’t correspond to the private key used by the CA to sign the certificate, the server won’t authenticate the user’s identity. If the CA’s digital signature can be validated, the server treats the user’s certificate as a valid “letter of introduction” from that CA and proceeds. At this point, the SSL protocol allows the server to consider the client authenticated and proceed with the connection as described in step 6. The directory servers may optionally be configured to perform step 5 before step 6.

  5. Is the user’s certificate listed in the LDAP entry for the user?

    This optional step provides one way for a system administrator to revoke a user’s certificate even if it passes the tests in all the other steps. The Certificate Management System can automatically remove a revoked certificate from the user’s entry in the LDAP directory. All servers that are set up to perform this step then refuses to authenticate that certificate or establish a connection. If the user’s certificate in the directory is identical to the user’s certificate presented in the SSL handshake, the server goes on to the next step.

  6. Is the authenticated client authorized to access the requested resources?

    The server checks what resources the client is permitted to access according to the server’s access control lists (ACLs) and establishes a connection with appropriate access. If the server doesn’t get to step 6 for any reason, the user identified by the certificate cannot be authenticated, and the user is not allowed to access any server resources that require authentication.

Digital Signatures

Digital signatures can be used by Directory Server to maintain integrity of information. If encryption and message digests are applied to the information being sent, the recipient can determine that the information was not tampered with during transit.

Tamper detection and related authentication techniques rely on a mathematical function called a one-way hash. This function is also called a message digest. A one-way hash is a number of fixed length with the following characteristics:

  • The value of the hash is unique for the hashed data. Any change in the data, even deleting or altering a single character, results in a different value.

  • The content of the hashed data cannot, for all practical purposes, be deduced from the hash — which is why it is called one-way.

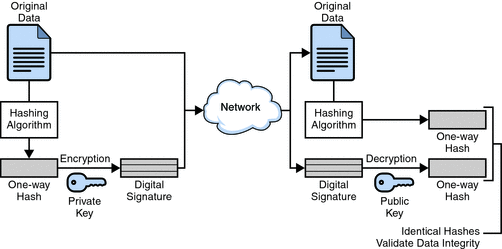
It is possible to use a private key for encryption and a public key for decryption. Although this is not desirable when you are encrypting sensitive information, it is a crucial part of digitally signing any data. Instead of encrypting the data itself, the signing software creates a one-way hash of the data, then uses your private key to encrypt the hash. The encrypted hash, along with other information, such as the hashing algorithm, is known as a digital signature. Figure 5–11 shows two items transferred to the recipient of some signed data.

Figure 5–11 Digital Signatures
Digital Signature

In Figure 5–11, the original data and the digital signature, which is basically a one-way hash (of the original data) that has been encrypted with the signer’s private key. To validate the integrity of the data, the receiving software first uses the signer’s public key to decrypt the hash. It then uses the same hashing algorithm that generated the original hash to generate a new one-way hash of the same data. (Information about the hashing algorithm used is sent with the digital signature, although this isn’t shown in the figure.) Finally, the receiving software compares the new hash against the original hash. If the two hashes match, the data has not changed since it was signed. If they don’t match, the data may have been tampered with since it was signed, or the signature may have been created with a private key that doesn’t correspond to the public key presented by the signer.

If the two hashes match, the recipient can be certain that the public key used to decrypt the digital signature corresponds to the private key used to create the digital signature. Confirming the identity of the signer, however, also requires some way of confirming that the public key really belongs to a particular person or other entity.

The significance of a digital signature is comparable to the significance of a handwritten signature. Once you have signed some data, it is difficult to deny doing so later — assuming that the private key has not been compromised or out of the owner’s control. This quality of digital signatures provides a high degree of non-repudiation — that is, digital signatures make it difficult for the signer to deny having signed the data. In some situations, a digital signature may be as legally binding as a handwritten signature.

Reference

Messages Exchanged During SSL Handshake
Server Authentication During SSL Handshake
Client Authentication During SSL Handshake
Digital Signatures

SOAP technical setup in SAP for Webservice

Posted on 2018-03-22 | In SAP

To enable a webservice in SAP system, we have to perform SOAP technical setup if it was not completed before.

SOAP technical setup in SAP

  1. Run t-code SRT_ADMIN to perform automatic setup for the below technical settings
    • bgRFC inbound destination
    • bgRFC supervisor destination
    • Service RFC destination and user
    • ICF nodes
  2. Run t-code SRM_ADMIN to check the technical settings
  3. Make sure the Webservice SICF service /sap/bc/srt/xip/sap/<webservice_name> is activated in t-code SICF

Errors and Resolutions

  • Error:

    The webservice message is hanging in webservice monitor SRT_MONI with status wait for scheduler.

  • Resolution:

    Based on SAP note 2278161, the probable reason is the incomplete setup of bgRFC supervisor destination. Complete the technical settings setup in SRT_ADMIN to fix the issue.

TLS Handshake

Posted on 2018-03-22 | In Network

TLS/SSL is used to establish connection in HTTPS. Here I will note down my understanding for the TLS handshake process.

The Transport Layer Security (TLS) Handshake Protocol is responsible for the authentication and key exchange necessary to establish or resume secure sessions. When establishing a secure session, the Handshake Protocol manages the following:

  • Cipher suite negotiation
  • Authentication of the server and optionally, the client
  • Session key information exchange.

Cipher Suite Negotiation

The client and server make contact and choose the cipher suite that will be used throughout their message exchange.

Authentication

In TLS, a server proves its identity to the client. The client might also need to prove its identity to the server. PKI, the use of public/private key pairs, is the basis of this authentication. The exact method used for authentication is determined by the cipher suite negotiated.

Key Exchange

The client and server exchange random numbers and a special number called the premaster secret. These numbers are combined with additional data permitting client and server to create their shared secret, called the master secret. The master secret is used by client and server to generate the write MAC secret, which is the session key used for hashing, and the write key, which is the session key used for encryption.

Establishing a Secure Session by Using TLS

  1. The client sends a Client hello message to the server, along with the client’s random value and supported cipher suites.
  2. The server responds by sending a Server hello message to the client, along with the server’s random value, the selected cipher suite and session id.
  3. The server sends its certificate to the client with a Certificate message for authentication.
  4. Optional. This step is required when the client requires additional data to generate a premaster secret based on the key exchange algorithm such as DHE_RSA in the selected cipher suite. The server sends a Server key exchange message to the client, along with Diffie-Hellman parameters.
  5. Optional. This step is required for client authentication. The server requests a certificate from the client with a Certificate request message.
  6. The server sends the Server hello done message.
  7. The client verifies the sever’s certificate.
  8. Optional. This step is required for client authentication. The client sends its certificate with a Certificate message.
  9. The client sends a Client key exchange message to the server.
    • It may contain the RSA-encrypted random premaster secret based on the key exchange algorithm such as RSA in the selected cipher suite. In this case, premaster secret is encrypted with the public key from the server’s certificate.
    • It may contain Diffie-Hellman parameters that will allow each side to agree upon the same premaster secret based on the key exchange algorithm such as DHE_RSA in the selected cipher suite.
  10. Optional. The client sends a Certificate verify message to server.
  11. Optional. This step is required for client authentication. The server verifies the client’s certificate.
  12. The server receives the premaster secret by decryption or calculation. The server and client each generate the master secret and session keys based on the premaster secret, client’s random value and server’s random value.
    • In case of key exchange algorithm such as RSA in the selected cipher suite, the server will decrypt the encrypted premaster secret with its private key based on RSA asymmetric encryption algorithm.
    • In case of key exchange algorithm such as DHE_RSA in the selected cipher suite, the server will calculate the premaster secret with the Diffie-Hellman parameters based on Diffie–Hellman key exchange algorithm.
  13. The client sends Change cipher spec message to server to indicate that the client will start using the session key for hashing and encrypting messages.
  14. Client also sends Client finished message which is encrypted with session key based on the symmetric encryption algorithm of the selected cipher suite.
  15. Server sends Change cipher spec and switches its record layer security state to symmetric encryption using the session key.
  16. Server sends Server finished message to the client which is encrypted with session key based on the symmetric encryption algorithm of the selected cipher suite.
  17. Client and server can now exchange application data over the secured channel they have established. All messages sent from client to server and from server to client are encrypted using session key.

Resuming a Secure Session by Using TLS

  1. The client sends a Client hello message using the Session ID of the session to be resumed.
  2. The server checks its session cache for a matching Session ID. If a match is found, and the server is able to resume the session, it sends a Server hello message with the Session ID.

    Note If a session ID match is not found, the server generates a new session ID and the TLS client and server perform a full handshake.

  3. Client and server must exchange Change cipher spec messages and send Client finished and Server finished messages.
  4. Client and server can now resume application data exchange over the secure channel.

Encryption techniques in TLS

TLS uses asymmetric encryption techniques to generate a shared secret key premaster secret, which avoids the key distribution problem. It uses the shared key for the symmetric encryption of application data, which is faster than asymmetric encryption.

  • Asymmetric encryption: There is a public-private key pair. The data can be encypted with one key, and decrypted with another key.
  • Symmetric encryption: There is one shared key. The data can be encypted and decrypted with the same key. It is faster than asymmetric encryption.

RSA

RSA is an asymmetric public-private key encyption algorithm. In TLS, it is used by client to transfer the premaster secret and server to decrypt it to get it.

AES/3DES

AES and 3DES are symmetric key encyption algorithms. In TLS, it is used by client and server to encypt and decrypt application data.

Diffie–Hellman key exchange

Diffie–Hellman is a key exchange algorithm to establish a shared secret between two parties. In TLS, it can be used together than RSA to establish a shared secret premaster secret between server and client.

Cipher Suite

It contains the key exchange algorithm such as RSA/DHE_RSA, and cipher which defines the symmetric encyption algorithm such as AES.

Reference

TLS Handshake Protocol (Windows) - MSDN - Microsoft
An overview of the SSL or TLS handshake - IBM
Transport Layer Security - Wikipedia
SSL: Foundation for Web Security - The Internet Protocol
RFC 5246 - The Transport Layer Security (TLS) Protocol Version 1.2

Debug Hexo with VS Code

Posted on 2018-03-21 | In Node.js

Background

I need to add the code highlighting feature for ABAP language in Hexo, so I would need to debug the Hexo Node.js application. The tool I am using is Visual Studio Code.

The code for programing language is highlighted when the website files are generated from markdown files using Hexo command hexo generate. Actually, the hexo command hexo generate is the abbreviation for node <hexo_base_folder>/node_modules/hexo/node_modules/hexo-cli/bin/hexo generate. So, I will use the configuration Node.js: Launch Program in VS code to debug the Hexo application.

Steps to debug Hexo application

  1. Open the Hexo base folder in Visual Studio Code.

  2. Switch to Debug view, and choose Add Configuration... in the No Configuration dropdown box

  3. In the configuration file launch.json, choose {} Node.js: Launch Program, change the program parameter for the Hexo bin file location, and add a parameter args with value generate manually or by pressing Ctrl + Space. Save the configuration file.

    1
    2
    3
    4
    5
    6
    7
    8
    9
    10
    11
    12
    13
    14
    15
    16
    17
    {
    // Use IntelliSense to learn about possible attributes.
    // Hover to view descriptions of existing attributes.
    // For more information, visit: https://go.microsoft.com/fwlink/?linkid=830387
    "version": "0.2.0",
    "configurations": [
    {
    "type": "node",
    "request": "launch",
    "name": "node",
    "program": "${workspaceFolder}/node_modules/hexo/node_modules/hexo-cli/bin/hexo",
    "args": [
    "generate"
    ]
    }
    ]
    }
  4. Open a JavaScript file in VS code, like <hexo base folder>\node_modules\hexo\node_modules\hexo-cli\lib\hexo.js, and add a breakpoint in it

  5. Press the Start debugging button to start debugging, and the VS Code debugger will stop at the breakpoint.

    You will find the below information in DEBUG CONSOLE.

    node –inspect-brk=25386 node_modules\hexo\node_modules\hexo-cli\bin\hexo generate
    Debugger listening on ws://127.0.0.1:25386/f253557e-17e7-4480-aa80-88b839ed4fe2

123…5

Gary Guo

23 posts
9 categories
19 tags
Links
  • Markdown Cheatsheet
  • JSFiddle
  • JavaScript - Liao XueFeng
  • Git - Liao XueFeng
  • Blog - Ruan YiFeng
© 2018 Gary Guo
Powered by Hexo
|
Theme — NexT.Gemini v6.0.5